m (Added useful links) |
No edit summary |
||
| (5 intermediate revisions by 3 users not shown) | |||
| Line 1: | Line 1: | ||
This page | This page does not aim at teaching you the basics of 3D modelling in Blender, you can find plenty of resources on the internet to help you in this area. This page aims at providing you a few guidelines to help you in your part making journey. Those are not hard rules, just little tips that might help you have an easier time with KSP2 modding. | ||
== UV Unwrapping == | |||
[[wikipedia:UV_mapping#UV_unwrapping|UV unwrapping]] is the process of mapping parts of your 3D mesh to a flat "UV map" which will tell what part of the model a pixel on a texture corresponds to. As with modelling, there are a lot of resources online about UV unwrapping in Blender but here are a few steps you can follow to quickly unwrap a part's model: | |||
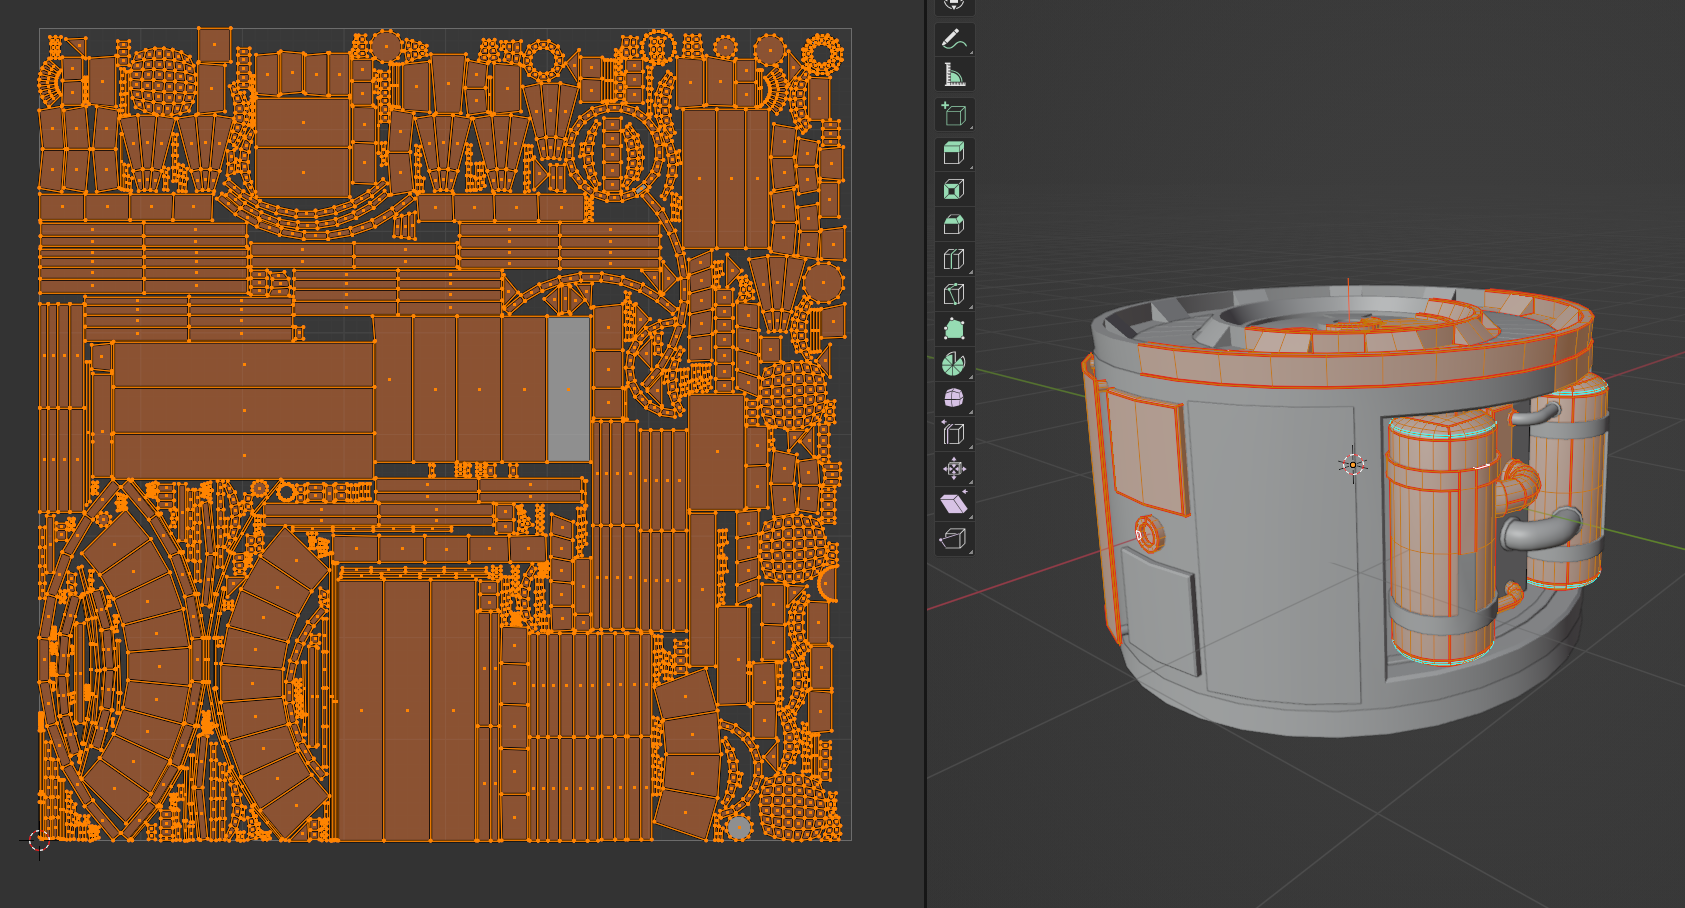
# | [[File:Blender UV map example.png|alt=Screenshot of an UV map for a KSP2 part in Blender|thumb|Example of an '''UV map''' for a KSP2 part. The '''marked seams''' are visible in red.]] | ||
#Mark "hard" edges as '''Seams''', this means that the UV unwrapping algorithms will treat those edges as "borders" for islands of faces in the UV map: | |||
## Press '''Tab''' to enter Edit Mode. | ## Press '''Tab''' to enter Edit Mode. | ||
## Click '''Select > Select Sharp Edges''' (the angle should be 30°). | ## Click '''Select > Select Sharp Edges''' (the angle should be 30°). | ||
## Press '''Ctrl + E > Mark Seams'''. | ## Press '''Ctrl+E > Mark Seams'''. | ||
## Manually remove excess seams | ## Manually remove excess seams: try to have only one seam for each series of continuous faces: '''Ctrl+E > Clear Seams'''. | ||
# Press '''A''' to select the entire mesh. | # Press '''A''' to select the entire mesh. | ||
# Click '''UV''' (on the right menu) > '''Smart UV project''', with a margin of 0.003. | # Click '''UV''' (on the right menu) > '''Smart UV project''', with a margin of 0.003. | ||
# Click '''UV''' (on the left menu) '''> Pack islands''', with a margin of 0.003. | # Click '''UV''' (on the left menu) '''> Pack islands''', with a margin of 0.003. | ||
* | The main thing to keep in mind when UV unwrapping is that you want to avoid faces overlapping in the UV map and you want the map to be as dense as possible to make full use of your textures' resolution. | ||
* | |||
== Material == | |||
We recommend assigning the same single material to all objects in your mesh and giving this material a relevant name. This will make things cleaner when importing the mesh in a texturing software such as Substance Painter. | |||
== Exporting the mesh == | |||
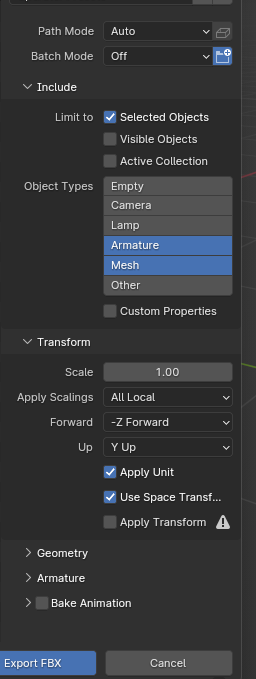
[[File:Blender FBX export settings for KSP2.png|alt=Screenshot of Blender FBX export settings.|thumb|FBX export settings used for KSP2 parts.]] | |||
Make sure the '''origin''' of the mesh is near where you want the '''Center of Mass''' to be. Make sure the mesh rests at the world origin <code>(0, 0, 0)</code>. | |||
Make sure to apply all transformations to your mesh by selecting it and pressing '''Ctrl+A > All Transforms'''. | |||
Also make sure to apply all '''Boolean''' modifiers, you can leave '''Array''' and '''Mirror''' modifiers not applied (this means however that the mirrored/arrayed objects will share the same texture). | |||
The export procedure is then as follows: | |||
# Select all objects in the mesh you want to be part of your asset. | |||
# Click on '''File > Export > FBX (.fbx)'''. Give a specific name to the file, for example: <code>my_mod_my_part.fbx</code> | |||
# On the right of the window click on '''Selected Objects''' to make sure only stuff you want is exported. | |||
# Uncheck '''Bake Animation'''. | |||
# Click on '''Export FBX'''. | |||
== Miscellaneous == | |||
If you’re making an engine, put an empty single arrow at the world origin facing in the direction your engine will fire, then move it along the axis of the engine so that it’s at the exit of the engine. Name this object '''thrustTransform''', and keep in mind that size does not matter. | |||
== Useful links == | |||
* Blender tutorial fuel tank KSP1: https://www.youtube.com/watch?v=VJy5cXd04uk | |||
* Blender tutorial for modeling a pod for KSP1 (series): https://www.youtube.com/watch?v=rUXDb8mcW-A | |||
* Setting up seams and UV unwrap: https://www.youtube.com/watch?v=Fr2SX1rZZM0 | |||
[[Category: | [[Category:Parts and modules]] | ||
Latest revision as of 11:18, 24 February 2024
This page does not aim at teaching you the basics of 3D modelling in Blender, you can find plenty of resources on the internet to help you in this area. This page aims at providing you a few guidelines to help you in your part making journey. Those are not hard rules, just little tips that might help you have an easier time with KSP2 modding.
UV Unwrapping
UV unwrapping is the process of mapping parts of your 3D mesh to a flat "UV map" which will tell what part of the model a pixel on a texture corresponds to. As with modelling, there are a lot of resources online about UV unwrapping in Blender but here are a few steps you can follow to quickly unwrap a part's model:

- Mark "hard" edges as Seams, this means that the UV unwrapping algorithms will treat those edges as "borders" for islands of faces in the UV map:
- Press Tab to enter Edit Mode.
- Click Select > Select Sharp Edges (the angle should be 30°).
- Press Ctrl+E > Mark Seams.
- Manually remove excess seams: try to have only one seam for each series of continuous faces: Ctrl+E > Clear Seams.
- Press A to select the entire mesh.
- Click UV (on the right menu) > Smart UV project, with a margin of 0.003.
- Click UV (on the left menu) > Pack islands, with a margin of 0.003.
The main thing to keep in mind when UV unwrapping is that you want to avoid faces overlapping in the UV map and you want the map to be as dense as possible to make full use of your textures' resolution.
Material
We recommend assigning the same single material to all objects in your mesh and giving this material a relevant name. This will make things cleaner when importing the mesh in a texturing software such as Substance Painter.
Exporting the mesh

Make sure the origin of the mesh is near where you want the Center of Mass to be. Make sure the mesh rests at the world origin (0, 0, 0).
Make sure to apply all transformations to your mesh by selecting it and pressing Ctrl+A > All Transforms.
Also make sure to apply all Boolean modifiers, you can leave Array and Mirror modifiers not applied (this means however that the mirrored/arrayed objects will share the same texture).
The export procedure is then as follows:
- Select all objects in the mesh you want to be part of your asset.
- Click on File > Export > FBX (.fbx). Give a specific name to the file, for example:
my_mod_my_part.fbx - On the right of the window click on Selected Objects to make sure only stuff you want is exported.
- Uncheck Bake Animation.
- Click on Export FBX.
Miscellaneous
If you’re making an engine, put an empty single arrow at the world origin facing in the direction your engine will fire, then move it along the axis of the engine so that it’s at the exit of the engine. Name this object thrustTransform, and keep in mind that size does not matter.
Useful links
- Blender tutorial fuel tank KSP1: https://www.youtube.com/watch?v=VJy5cXd04uk
- Blender tutorial for modeling a pod for KSP1 (series): https://www.youtube.com/watch?v=rUXDb8mcW-A
- Setting up seams and UV unwrap: https://www.youtube.com/watch?v=Fr2SX1rZZM0